
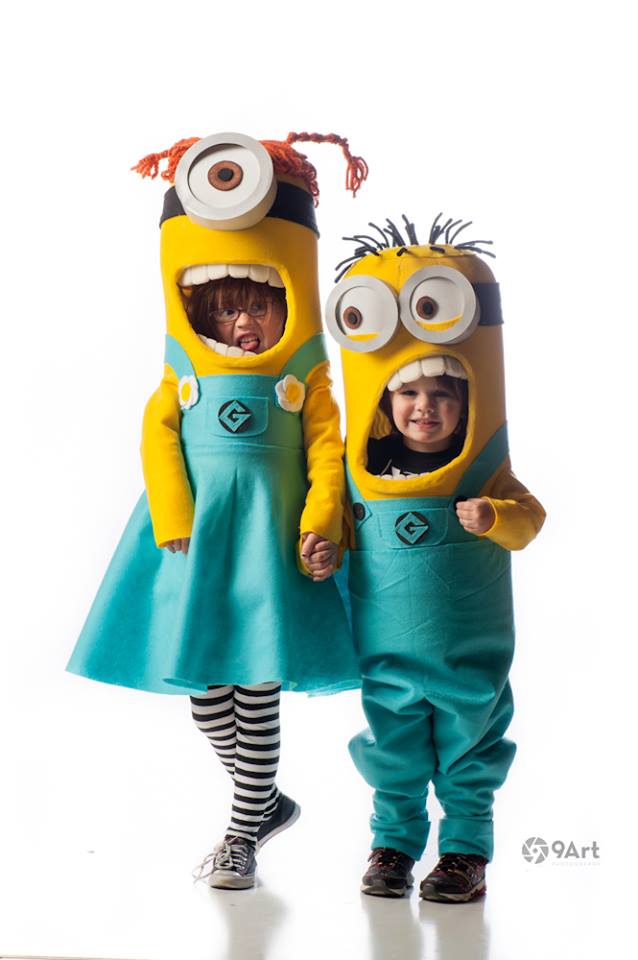
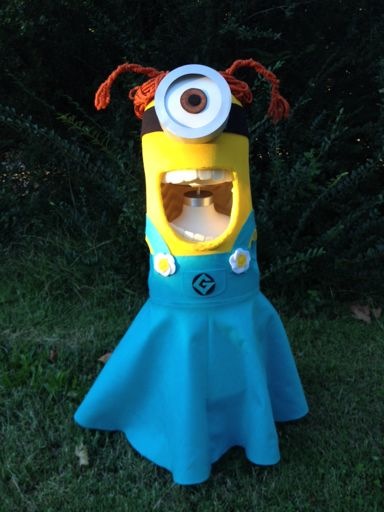
My kids are OBSESSED with the Minions from “Despicable Me.” So this year, I embarked upon the journey to turn them into my very own little Minions for Halloween. I’ll say it — I was kinda floored with the end results … I had to share these with the world.
First of all … grab a glass of wine and read the entire tutorial before starting on anything. Second? Take a deep breath … and know that you CAN do this. Please don’t be daunted by all the steps or how complicated it seems. I went overboard on the instructions – and I’m always here to answer any questions. You are a DIY BEAST, my friend. Let’s DO this thing.
Let’s be honest. The first thing I did was get on Pinterest to see what other crafty people out there were doing. I found two really excellent tutorials that had super cute results.
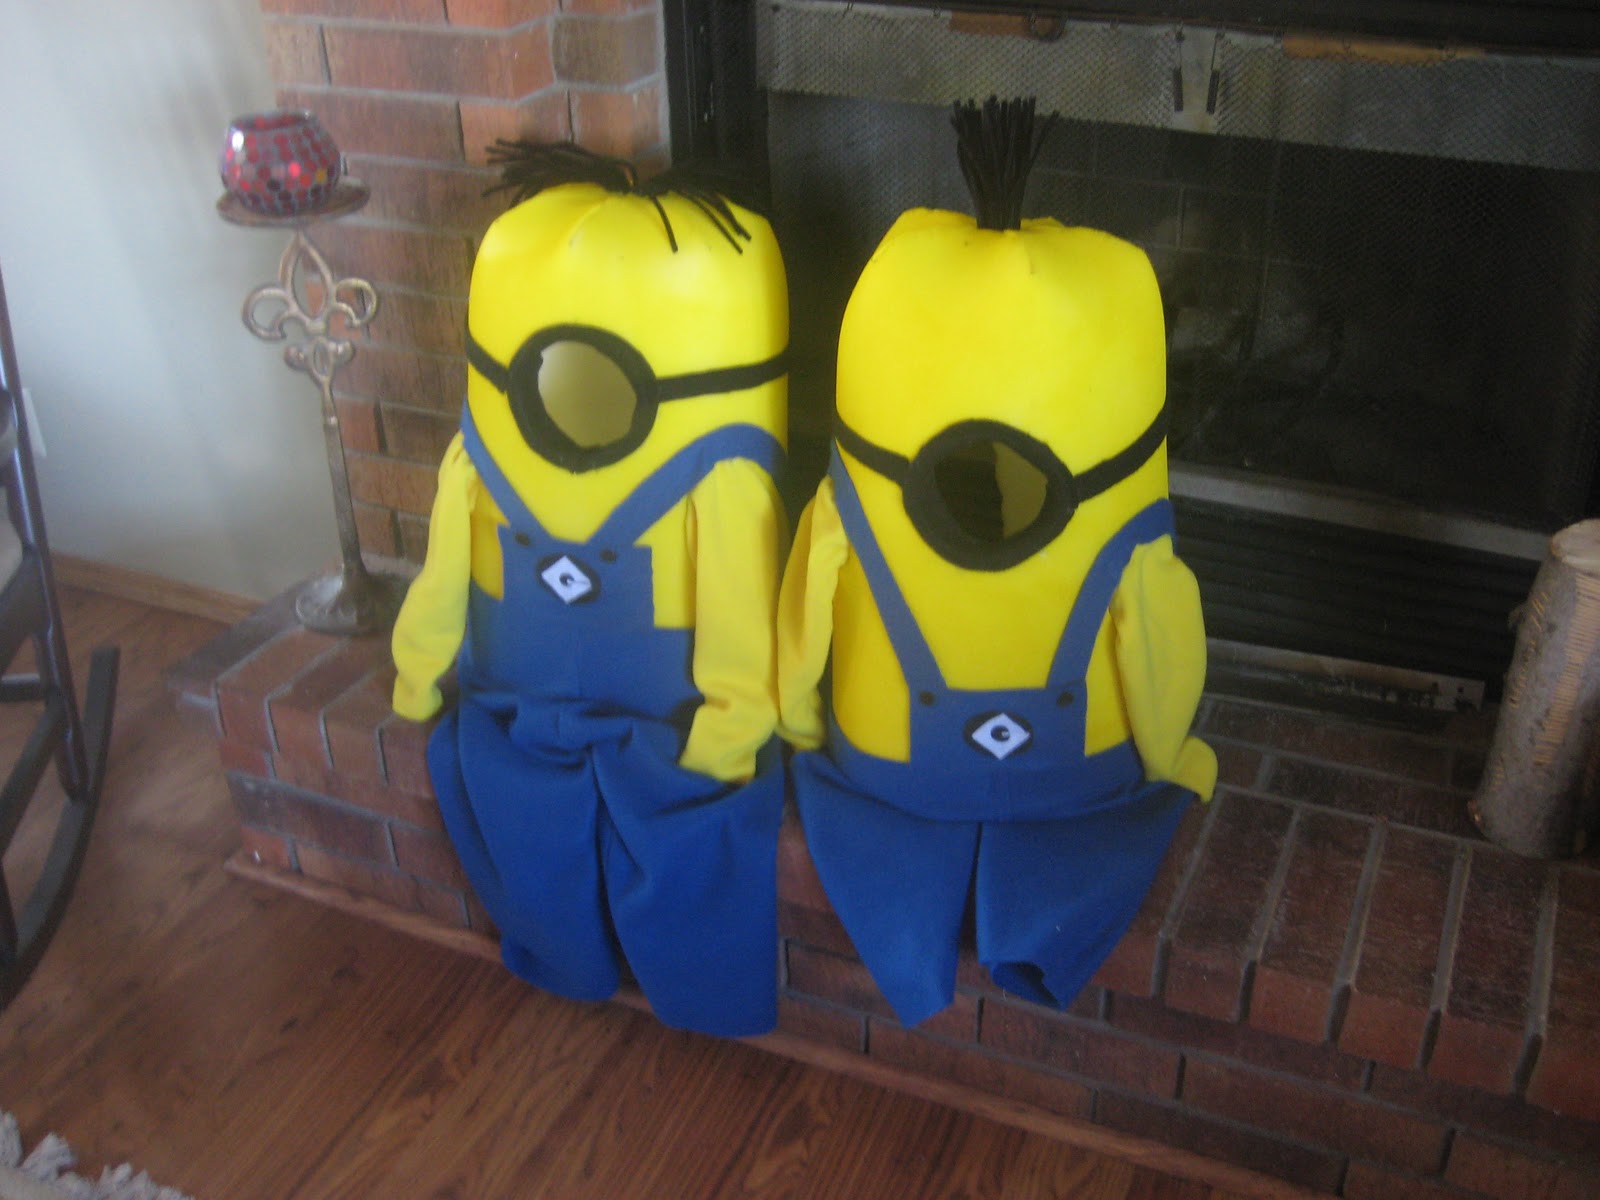
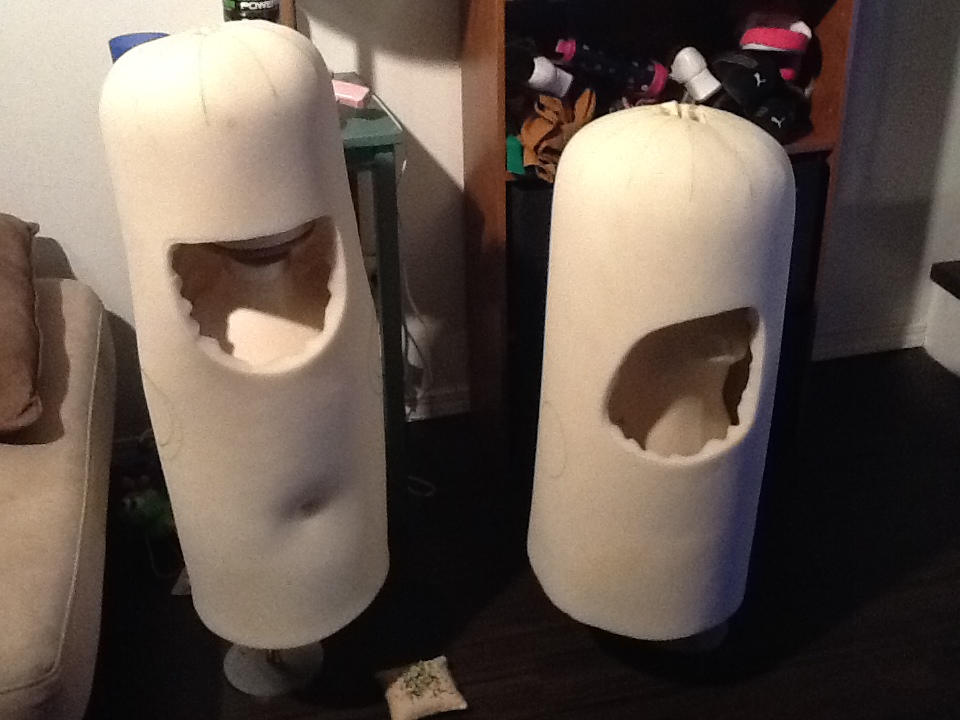
This guy made the body of his minion out of a plastic trash bin covered in upholstery foam. I loved the way he modeled the lips out of foam, too, to really animate the whole thing. But I *didn’t* like the idea of my kids being super uncomfortable and hot in a hard plastic container.

Whammo. This lady used an egg crate mattress pad to create the bodies of her minions. Genius! I knew right away that that’s what I wanted to do. But the other big problem I had with both of these designs was that the kids would be looking out of the goggle — which left them with very limited visibility. My kiddos are still little, which means they trip over their own feet when they’re wearing their REGULAR clothes.
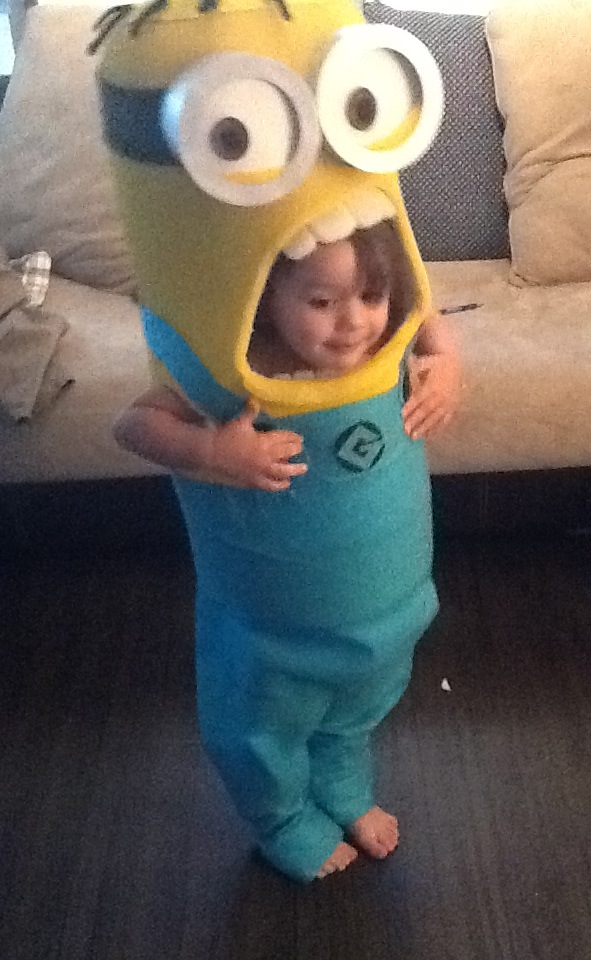
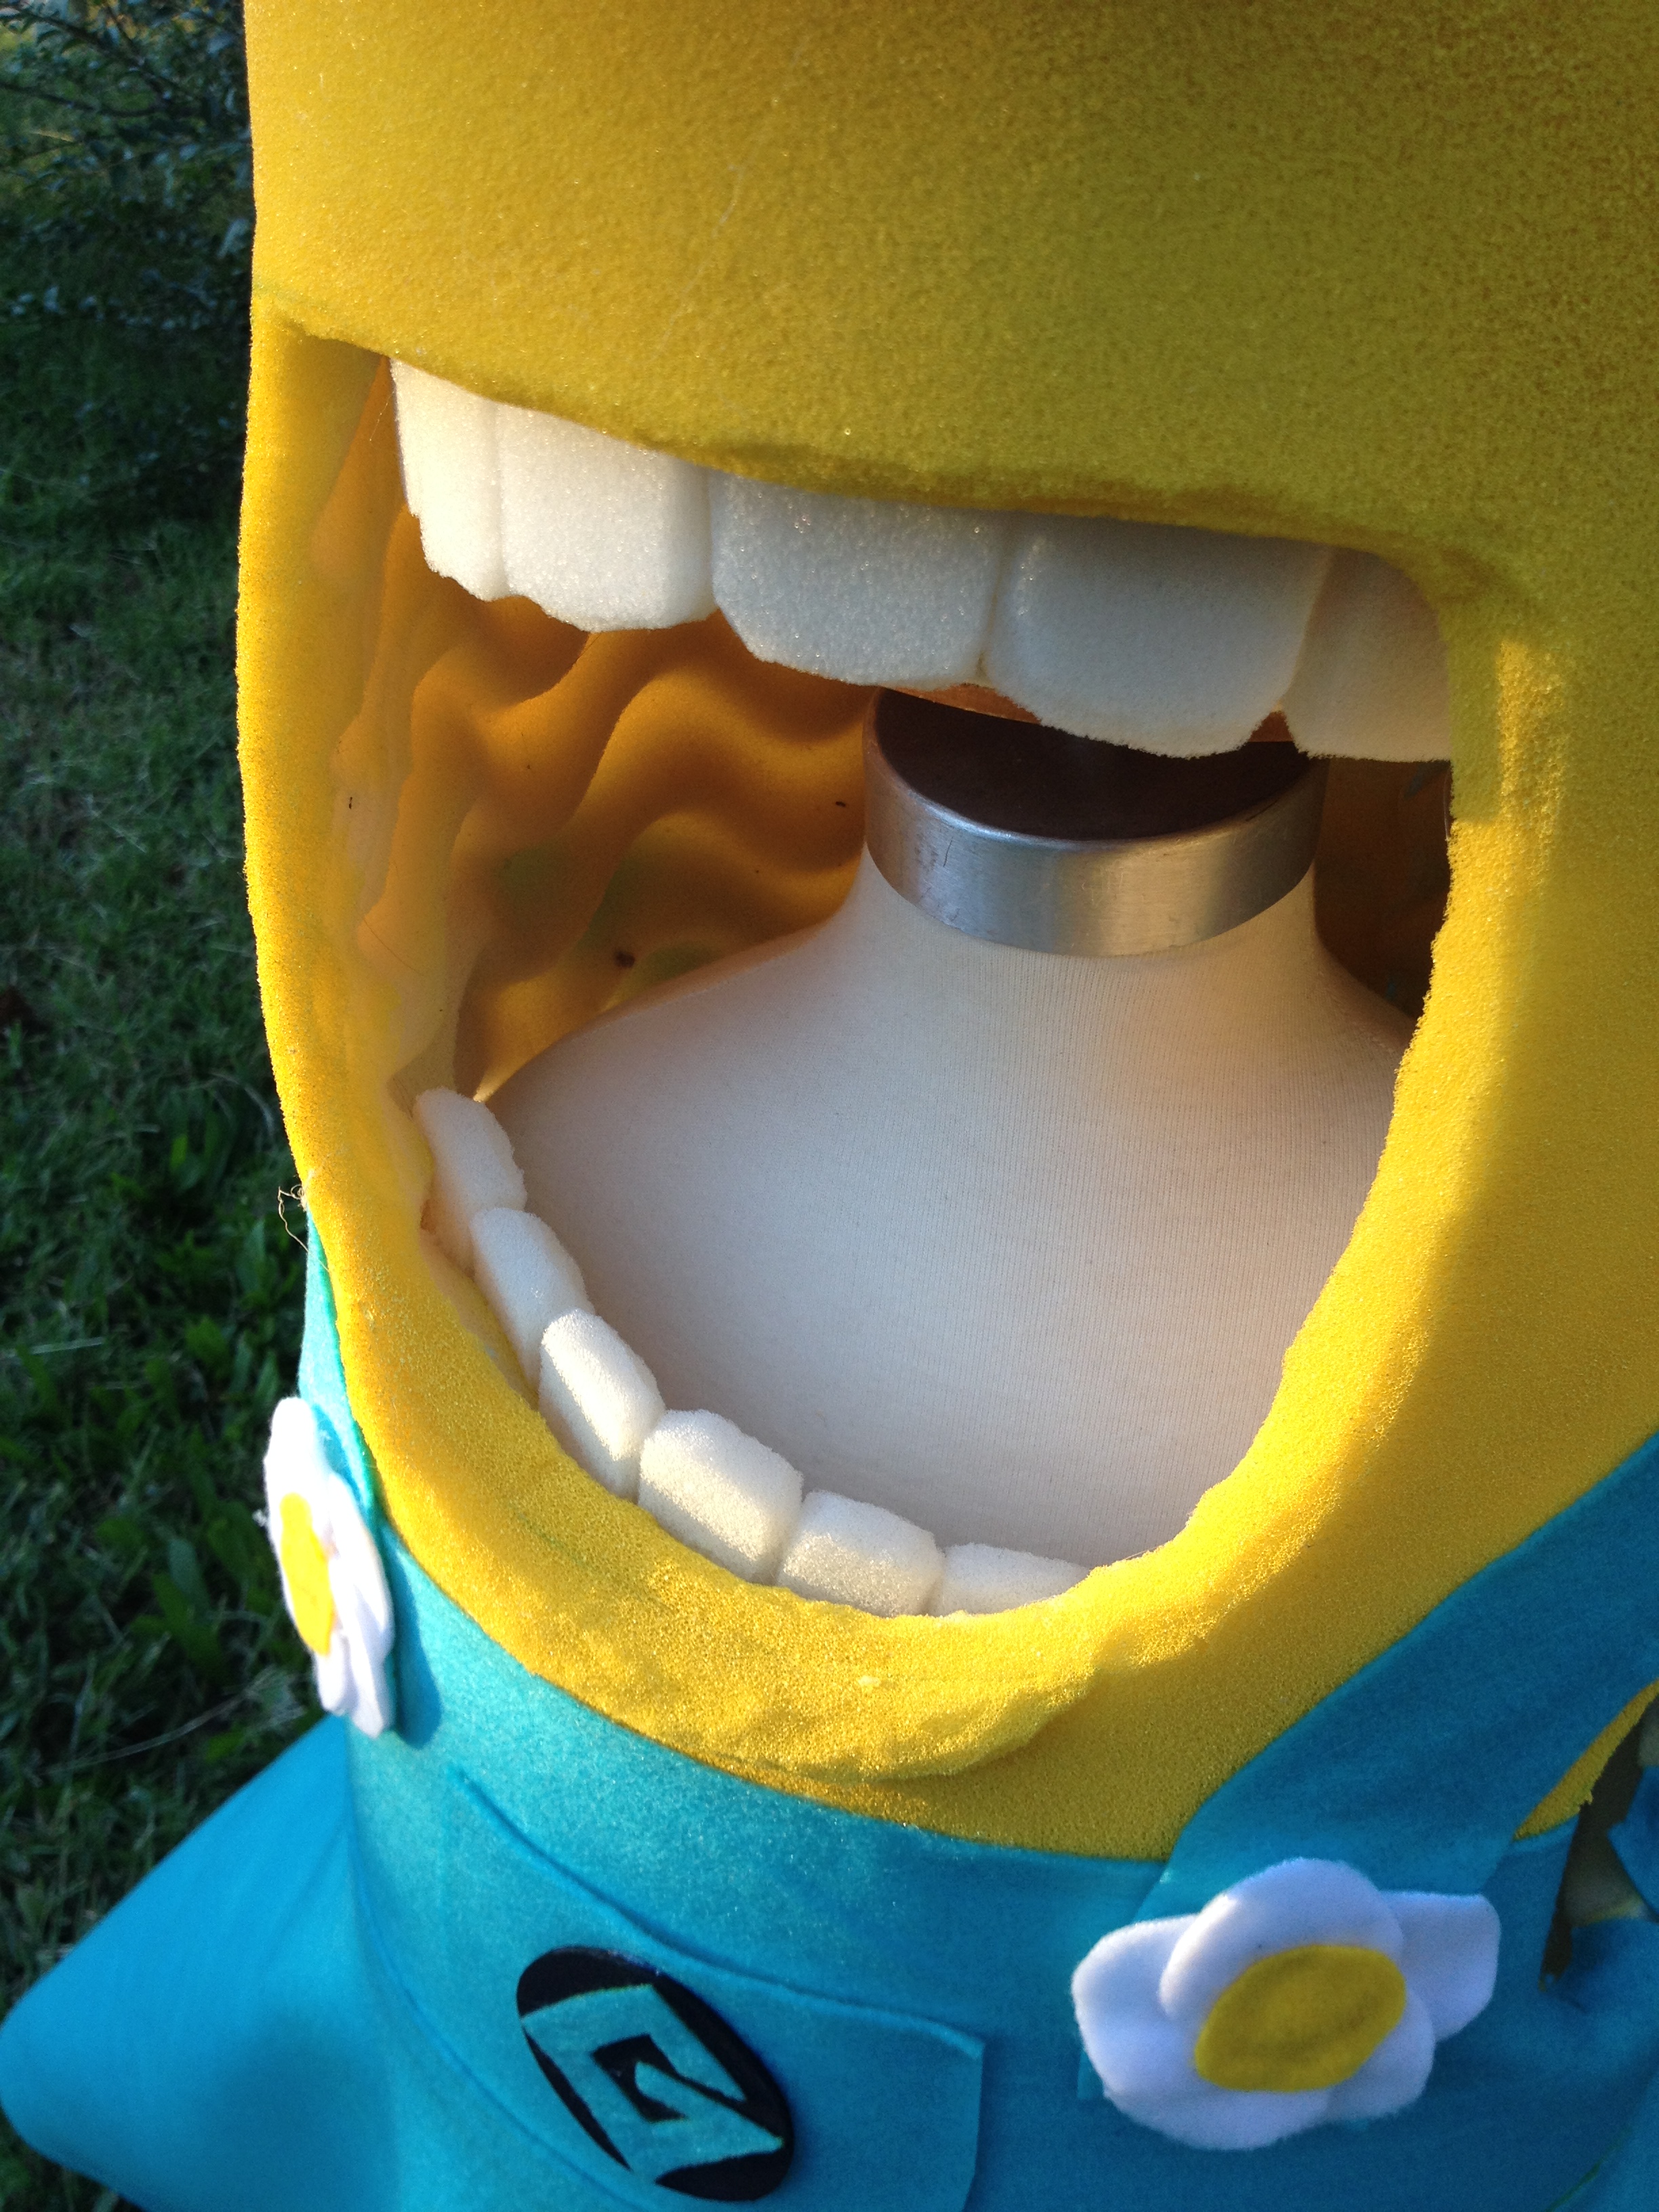
So I decided to modify the design a bit so their faces would be showing right out of the minion’s open mouth. This let them have lots of air, lots of room to see … And plus, I get the bonus of still being able to see their adorable faces for all those photo ops!
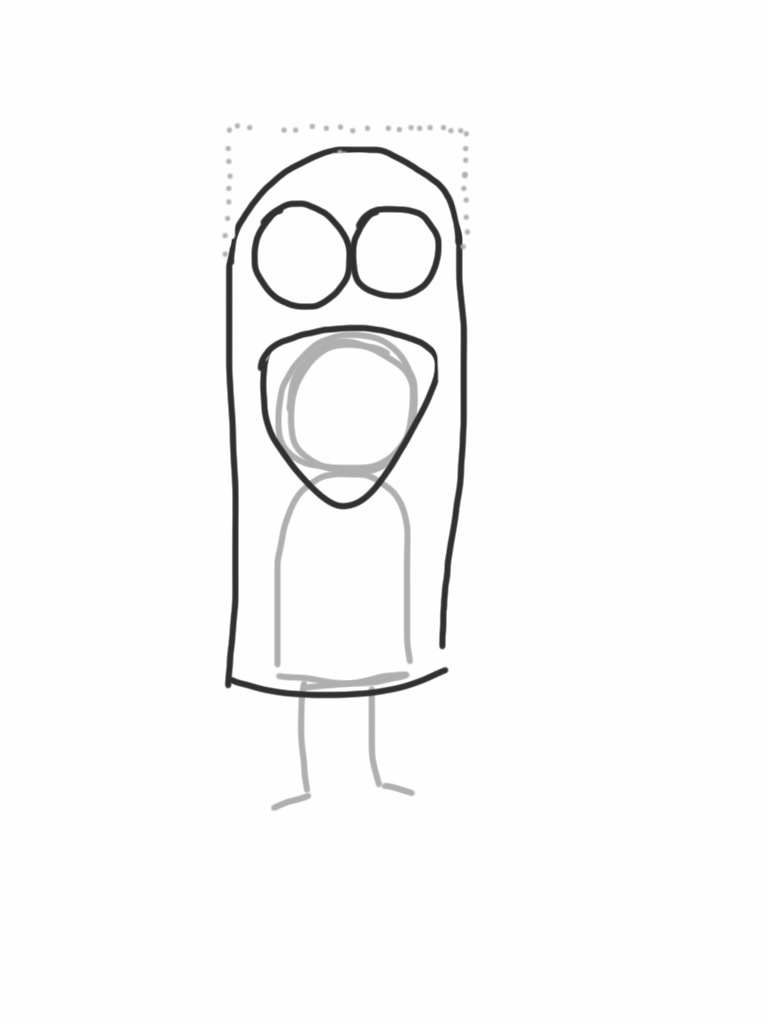
First, I wrapped the foam mattress pads around each of the kids to see where I’d need to cut them down — I ended up using one twin size to make both of the costumes. I really just eyeballed the sizes and proportions … Here’s a spiffy diagram that might help.
Once I knew the length and width of the piece of foam, I had to cut the top edge into sort of flower petals to be able to shape the top into a dome. The tutorial called for 6 or 7 petal shapes, I think … But after I glued them all together, I realized that the top now looked more like a crown than a round dome because there weren’t enough petals. So I cut off the top and started over, using twice as many petal shapes. For both costumes (slightly different sizes) I cut out 12 from the top, using a template to make sure all of my petals were exactly the same shape.
Learn from my mistake and use a highlighter or a yellow sharpie … Or something that’s actually made for is kind of thing to mark your petals. The green lines on mine are still bugging me.

Next, I slapped a bike helmet on a kids’ size dress form to hold everything while I worked. A big pillow might work too … but I can tell you, the helmet saved my life. To glue the petal shapes together to form a dome, I first wrapped my foam around the dress form and pinned it shut. I now had a foam tube with spikes on top.
I ran hot glue down on edge of one petal — then I bent it and the next one down I flat over the helmet … It really helped to create the smooth curve I was going for. Just repeat this process all the way around the top until you have all the petals glued together.

Now, you’re going to have a big ugly slightly star-shaped hole in the top — don’t worry. We can cover that up later. Just be sure that you use as much glue as you need to so those petals aren’t going anywhere. To be safe, I took a spare piece of foam and glued it on the underside, as well, to help hold everything together. I also glued the seam going down the back about five inches down to make sure everything stayed put.

Next, I made a paper template for the eyes and mouth — just to make sure I had the proportions right. When I liked how it looked, I traced the mouth and cut it out.
Now that I knew where the kid’s head was going to be, I could pad the inside of the minion head until the mouth lined up just right to show off their faces. I used pillow stuffing and some scrap fabric to hold it in place.

I tried them on the kids and marked where the arm holes would go. After I cut those out, I had the basic minion shape that would be the base of the costume! I added in an extra piece of foam for the bottom lip, using scissors to shape it … I also took my scissors to the contour around the entire mouth so it wasn’t just a flat edge, but that’s not strictly necessary. After that, I took it outside and painted that sucker using a can of good quality yellow spray paint … it took two light coats to get it all even and looking fabulous (except for those freaking green lines >=[]. )

To make the teeth, I just took the little scraps of foam that were left over from cutting the petals at the top and shaped them one by one using my little scissors, making sure to bevel all the edges so each one would stand out. I glued them all together in a line and then glued THAT to the insides of the mouth, to frame the kids’ faces – almost like they were really looking out from inside the minions’ mouths. Talk about a labor of love. It was kind of a pain in the butt … but the teeth are absolutely my favorite part of the costume – so it was totally worth it in the end!
GOGGLES
For the boy minion’s goggles, I used a round instant oats container wrapped in silver paper. I didn’t just slice off sections, though … I had to contour them to fit the round shape of the head.
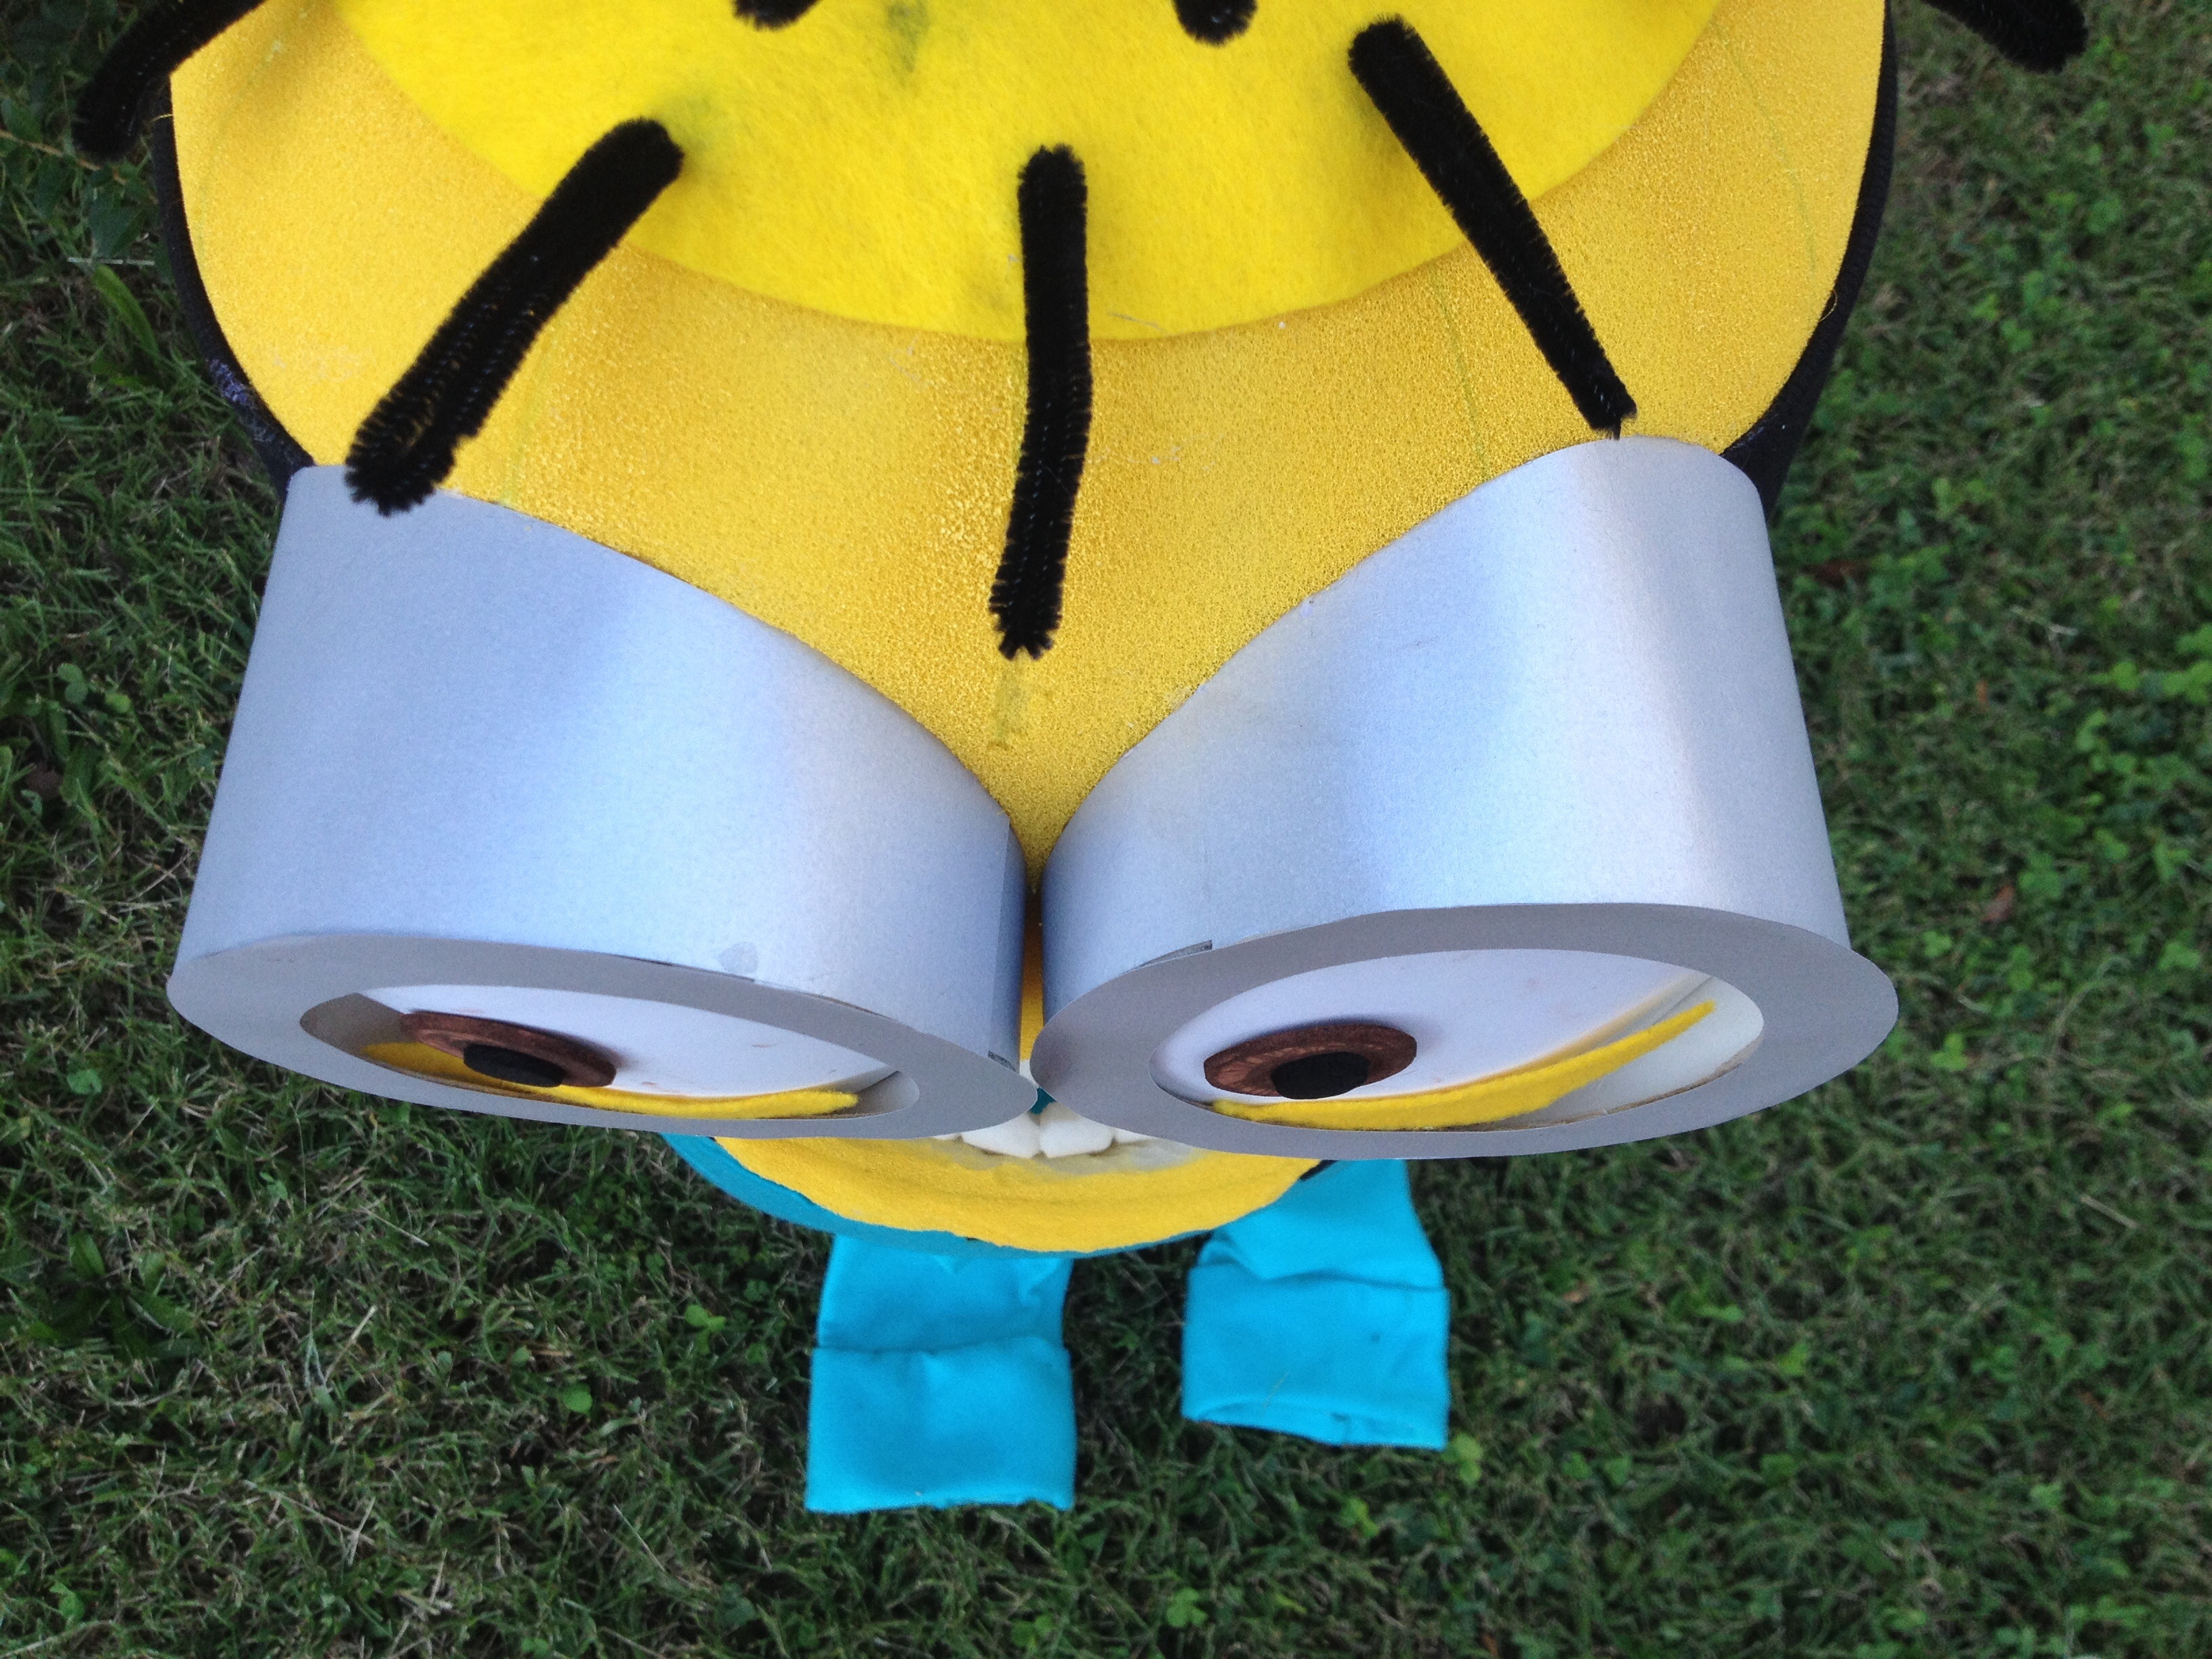
I wrapped the silver paper around each one and used my Silhouette cutting machine to cut out perfect circles to make the fronts.
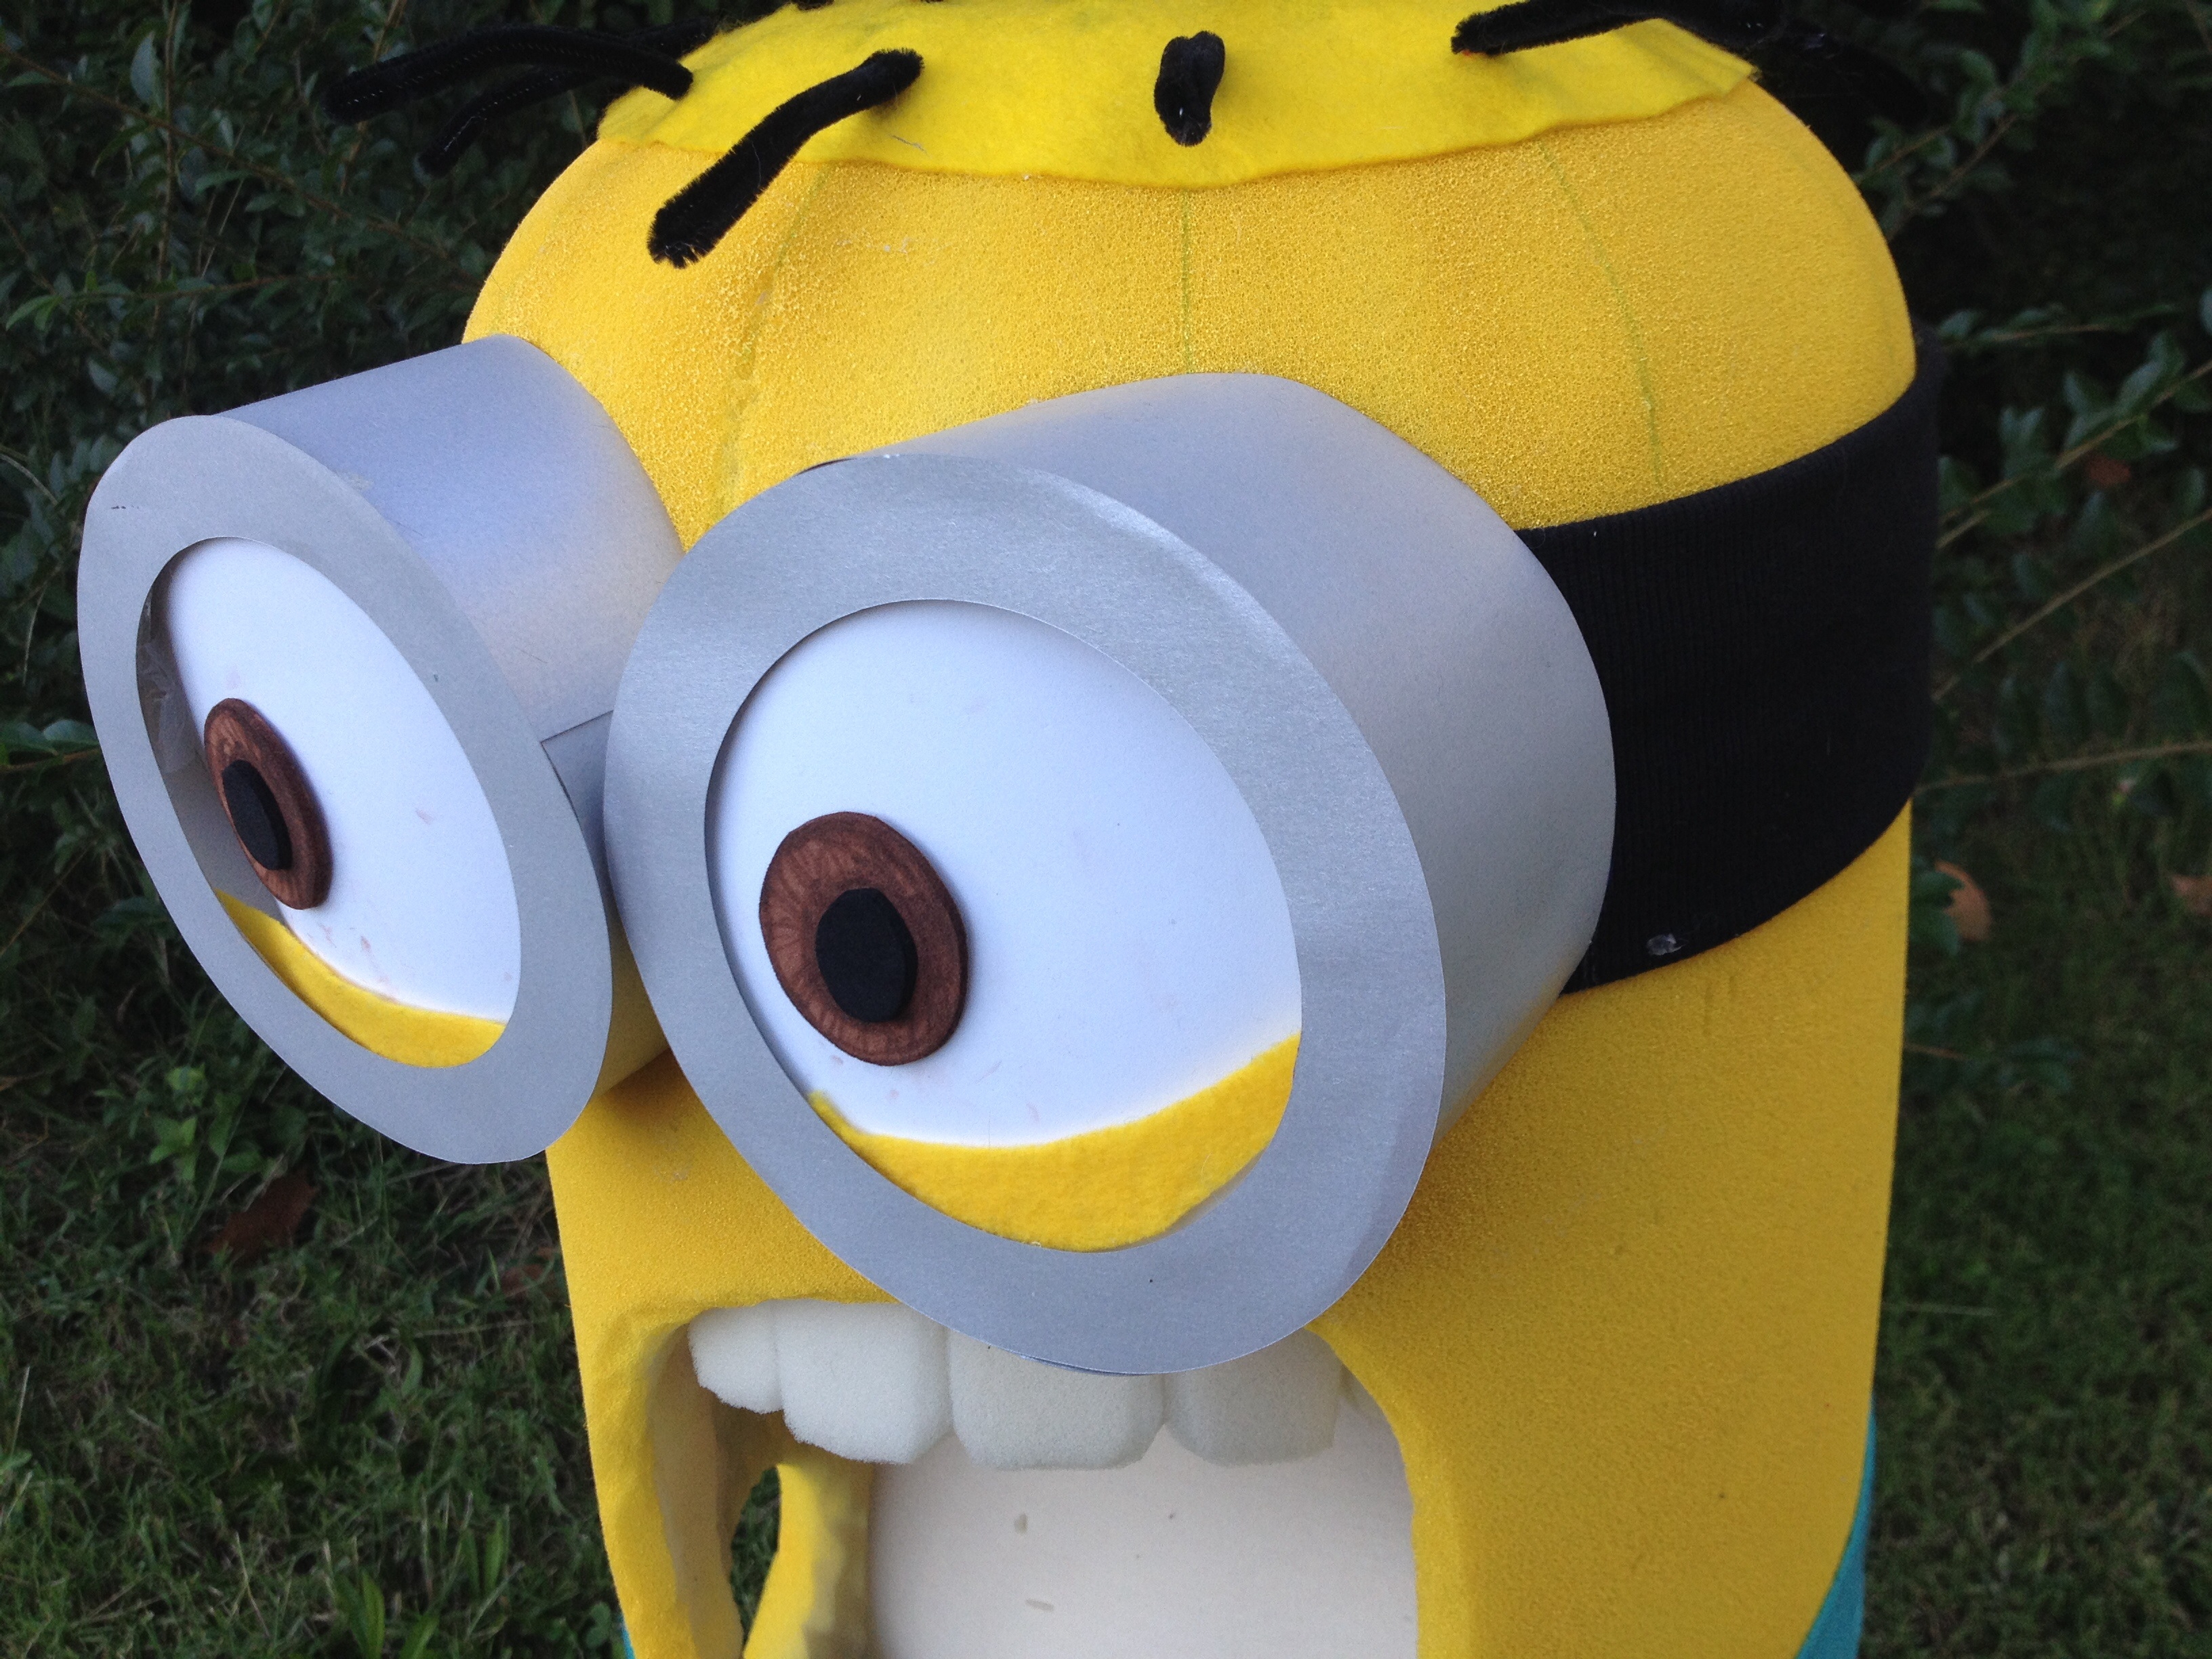
For the girl minion’s goggle, I followed the same process … but I used a sheet of heavy weight chip board, bent to form a circle, because her goggle is much larger and the oats canister looked ridiculous.

The eyeballs were made from sheets of white foam, cut into circles. For the irises and pupils, I used brown and black foam, with some shading using a darker brown marker. After I glued all the pieces of the eye together, I glued the whole thing to the inside of the goggle … I bent it to give it a slight 3D effect.

I used a stretchy knit fabric I had laying around for the straps – I started out with regular non stretchy cotton … DISASTER. I don’t recommend it. The stretch in the jersey knit is incredibly forgiving and hugs the head tight. PERFECT. I glued the strap down first and THEN the goggle, tucking the ends underneath. I added eyelids to the boy minion to give him more of the “Whaaaaa?” sort of vibe.

HAIR
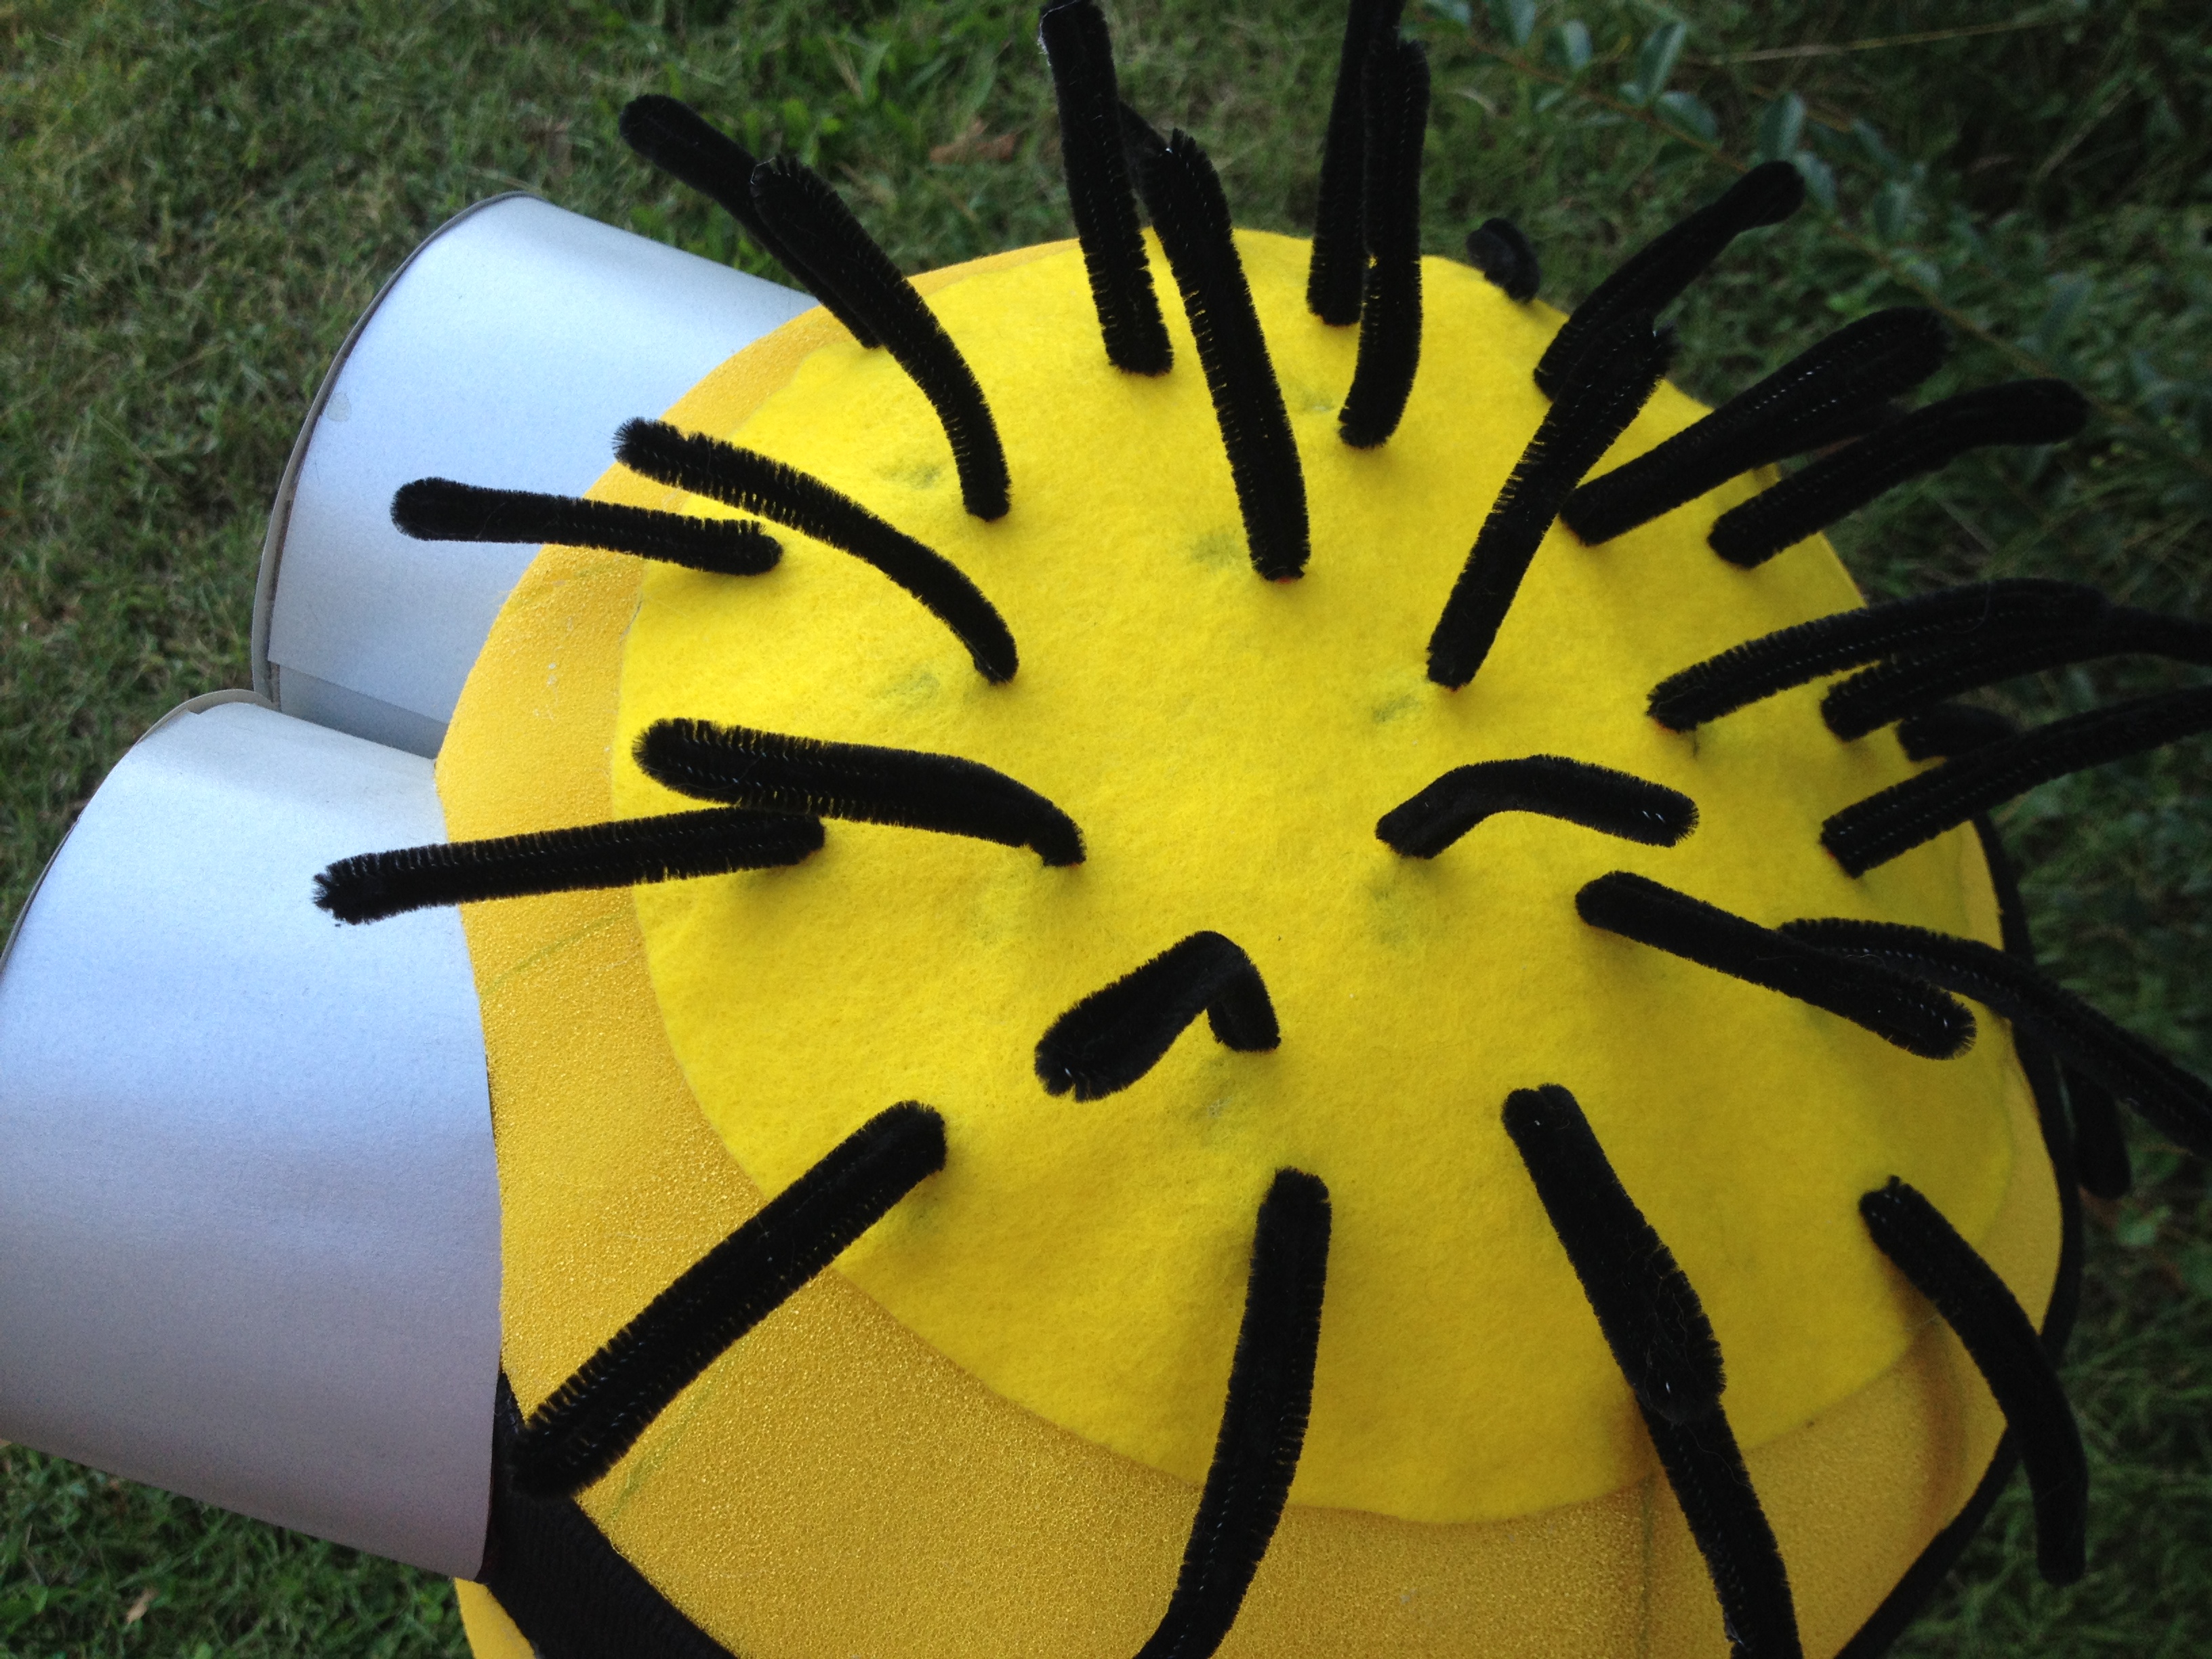
Remember that big gap on top of the head where it didn’t quite fit together? Yeah. I had to cover that. So I cut a circle out of yellow felt to cover almost the whole top of his head. Then I snipped small holes, spaced out evenly, and pushed some pipe cleaners through to make the hair. I doubled them over to make sure there weren’t any pointy bits sticking out. My son is accident prone and will find a way to hurt himself on anything. I bent the pipe cleaners so I could glue them to the underside of the yellow felt circle.

Then I glued the whole darn thing to the top of his head!
For HER hair, I wrapped orange yarn around two pipe cleaners, gluing as I went. I twisted the pipe cleaners and glued them together to make the little sticky uppy braids.

Double it and glue them to the top of the head. I covered them with little squares of yellow felt to make it more stable. Nobody wants saggy braids. The rest of her hair was basically just looped around and dumped on top – glued down in strategic places.

OVERALLS
I made both of their outfits using blue felt – I bought three yards of the stuff, just to be on the safe side, and ended up with a ton of extra. Here’s a diagram of the pieces I cut out for the boy minion’s outfit.

You’ll have to figure out the sizes of each of your pieces based on the dimensions of your minion body. I eyeballed everything but the pants. I measured all the way around the foam body, leaving about four inches of seam allowance for where it will wrap around the pieces of foam in the back. So for the pants, I used that measurement, cut my fabric and folded it over with the seam in the middle in the back. Then I cut out a petal shape from the middle to make pant legs and glued the seam that created. Doing it this way made the pants taper way in at the bottom, keeping the proportions of the original minion.

For the girl minion, I used basically the same shapes, but instead of pants I made a simple circle skirt. And instead of front and back bibs for the overalls, I used one long piece that I wrapped all the way around.

I ended up having to cut and trim to accommodate the arm holes … but it was worth it, since I wanted her outfit to be a bit more modest.

After I had my circle skirt cut out, I cut a line through it so I would be able to wrap the edges of the skirt around edges of the foam in the back. After both outfits were glued down, I added a strip of Velcro all the way down the seam of the body in the back to keep it all closed.

The last thing I did was add the buttons to him, the flowers to her … and of course, the Gru symbol on the front of each pocket. I used my black foam sheets for the buttons (pssst… a hole punch is perfect for making them look realistic). For the flowers, I used white and yellow felt, cut into circles and glued together.

The Gru symbol was made from a black foam circle and the same blue felt I used on the overalls. Here’s a template, if it helps.


And that’s it! You are now ready to prove to all the other parents that you love your kids more than is humanly possible. The costume contest at school? Yeah. You’re gonna win that. But the best part is … you’ll be a freaking HERO to your kid. It was worth all the hours and hot glue gun burns.
You. Are. VICTORIOUS.
Now go get yourself an aspirin and a bottle box of wine – and wait for the copious amounts of candy to come rolling in. You totally deserve it, Mom of the Year.

http://www.etsy.com/shop/minkspaperie
If you make this costume, I’m DYING to see the results! Post photos of your finished product on the Mink’s Paperie Facebook page for a chance to win a gift certificate to my Etsy shop!
https://www.facebook.com/pages/Minks-Paperie/126595007428128?ref=hl

Wow – that is awesome. Great job.
did you velcro the back of the boys costume as well? we have two boys and will attempt making this costume.. about what was the cost and how long did it take you?
Amazing job !
I am dieing of laughter over here. I was searching for minion costumes because I need to make one or two for my son and possibly another boy to wear as mascots for their high school robotics teams. Our colors are purple & yellow so we thought minions would be awesome! I clicked on the link from Pinterest & while it opened I went to grab a glass of wine and then I came back & read your first line-omg, I cracked up. I like the way the foam looks, but can you tell me, is it really warm if they wear it for awhile? These kids could be in the costumes for most of an 8-10 hour day, 2 days in a row, in a crowd of people so I don’t want them dieing of heat both days.
Love your designs and the way you have presented your ideas! You have a real talent, dont think my DIY costumes are going to be anywhere near that good.